Example of SAML configuration with Microsoft Entra ID
This page describes the steps to enable SAML authentication in Cyberwatch using Microsoft Entra ID as the identity provider.
It presents a minimal configuration for the SAML service to function.
Prerequisites
The procedure assumes that you have the following:
- An Azure account with an active subscription
- Administrator access to Microsoft Entra ID and Cyberwatch
Creating the SAML application in Entra ID
- Log in to the Azure portal:
https://portal.azure.com - Navigate to Microsoft Entra ID > Enterprise applications
- Click on “New application”, search for “Microsoft Entra SAML Toolkit”
- Give it a name (e.g.,
SAML Toolkit), click on “Create” - Start the SSO configuration by clicking on “Get started” in “Set up single sign on”, select SAML
Configuration of the Service Provider and Identity Provider in Entra ID and Cyberwatch
In Entra ID, configure the Service Provider in “Basic SAML Configuration”:
- Identifier (Entity ID): ID of Cyberwatch
- Reply URL (ACS): URL of Cyberwatch’s ACS
- Sign on URL: URL to log in to Cyberwatch
- Logout URL (optional): Single Logout URL
- Save the configuration
In Cyberwatch, specify the general information, Service Provider, and Identity Provider:
- Name ID format:
urn:oasis:names:tc:SAML:1.1:nameid-format:emailAddress - Login button text: “Entra ID SAML Login”
- SP Entity ID: ID of Cyberwatch
- IDP metadata URL: copy “App Federation Metadata URL” from Entra ID
- Apply to retrieve the IDP certificate
- IDP Entity ID: copy “Microsoft Entra Identifier” from Entra ID
- IDP SSO target URL: copy “Login URL” from Entra ID
- Save. The Cyberwatch certificate will be generated.
Upload the certificate generated by Cyberwatch to the SAML Toolkit application in Entra ID:
- Microsoft Entra ID > Enterprise applications > click on the name of the SAML Toolkit app
- Single sign-on > SAML Certificates > Verification certificates > Edit
- Check “Require verification certificates” and upload the certificate
For more information on creating the application, please refer to the Entra documentation https://learn.microsoft.com/en-us/entra/identity/saas-apps/saml-toolkit-tutorial
Optional - Advanced Configuration
Show advanced configuration details
This requires having a paid Entra ID license to perform certain actions
To configure roles, groups, and other attributes in Cyberwatch:
- Define roles in Entra ID > App registrations > name of the SAML Toolkit app > App roles > Create app role
- Define groups in Entra ID > Groups > New group
Note: These groups must be created in Cyberwatch for the mapping to be functional.
Associate groups and roles:
- Entra ID > Enterprise applications > name of the SAML Toolkit app
- Users and groups > check the group > Edit assignment
- Select the role > Assign
Here is an example linking an administrator role to Cyberwatch and using groups association :
- Attributes in Cyberwatch are configured like this:
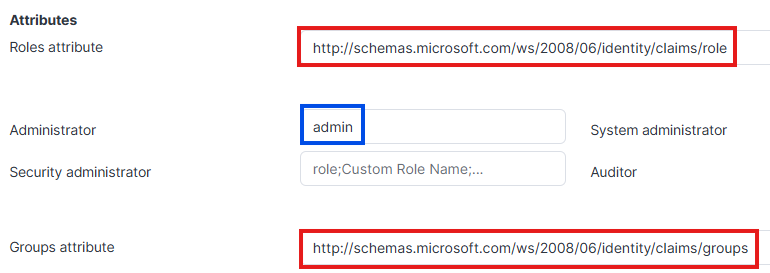
- The claims attributes used in Entra ID are:

- The role attribute will be its value in Entra ID:

With this configuration, all users with the admin role will be administrators in Cyberwatch and all users who are members of Entra ID groups will be associated with these groups in Cyberwatch.
Optional: Configuration of claims
Adding role and group claims
- Entra ID > Enterprise applications > name of the SAML Toolkit app > Single sign-on > Edit
For the role claim:
- Click on
Add new claim - In the Name field, enter
role - In
Namespace, enterhttp://schemas.microsoft.com/ws/2008/06/identity/claims - For Source Attribute, select
user.assignedroles - Click on Save
For the group claim:
- Click on
Add a group claim - Select
Groups assigned to the application - For Source Attribute, choose
Cloud-only group display names - Click on Save
For the description claim:
- Click on
Add new claim - In Name, enter description
- For
Source Attribute, choose for exampleuser.jobtitle - Click on Save
Note: The email address claim should already be configured in the SAML Toolkit application. Make the necessary configurations in Cyberwatch at the identity provider level. The connection should be correctly established, retrieving the attributes configured in Cyberwatch.
For more information on creating roles and groups, please refer to the Entra documentation:
Verifying the functionality
Open a private browsing window and access the Cyberwatch authentication page. An “Entra ID SAML Login” button should be displayed.
Click on it, the browser redirects to the Entra ID authentication page if the configurations are valid.
Authenticate with your credentials, the browser redirects you and authenticates you on Cyberwatch.
Verify the absence of an existing local/LDAP account in Cyberwatch using the same email address to avoid an error during login.
Troubleshooting
Don’t hesitate to contact Cyberwatch support for any technical assistance.